Showing posts with label wood sign. Show all posts

Thursday, March 15, 2012

Many Smiles

Recently, I was asked to make a custom sign for a sweet Texan lady. She saw a sign on Pinterest and wanted something similar but with southern charm. ;)
The inspiration sign came from a really sweet blog called Team Turnbow, which I discovered, today.
She offers cricut directions for making this sign.  I don't have a cricut machine, so I have directions for those who are cricut-less.

source: Pinterest


Maybe, I should show you my finished sign, first...


I changed "YOU" to Y'ALL"! I love it! 
It reminds me of a vintage Coca Cola sign. 
Now, that's a Southern sign!
You can change the words up for your version. You can change just the last word or the word smile to something else. What's important is that it fits you. 

Make It:

First, I went to my favorite store......LOWES to get my wood board. You can find boards of various sizes, there. I usually buy 4'x8'x.5" sheets, since I use all the wood. You can have them cut it to the size you want, too. I learned how to use a circular saw, so I just had them cut it in half, so I could fit it in my car.
When  I got home I cut a 30"x40" piece. 

Prep:

Sanded the edges.
Brush the dust off with my little dustpan broom.
You will need satin paint in the color of your choice. 
Brush on 2 coats of paint to cover the whole board. Paint the sides if you don't want to frame your sign.

Words:

* You have to work from right to left with this one. For example, I started with the letter "F" in the top right corner. Work your way to the left. I know, I know! Not like it isn't already a huge task. But well worth it. 
I only had Helvetica style stencils, that can be found at your hardware stores. Unfortunately, they have gaps in each letter, so they're not solid letters. I hand-painted each "gap" only to realize, afterward, that I could have used painter's tape to cover the "gaps" and make them solid letters! I know better, now. 
I used 6" letters on the 1st row, 8" letters on the 2nd row, and 3" letters for the 3rd row.
The last row, I hand drew. However, you can print it out on legal size paper, letter by letter, and trace onto board with tracing paper.
It took 3 coats of acrylic paint to do each letter.
The crazy thing about my style of signs, is how I mess it up after I paint it! Yep.
You can skip the distressing part if you like it the way it looks at this point.

Distressing:
Now, that all the letters are in place, take a medium grit sanding block and sand your little heart away. Make the letters look worn and gritty. I like it to look like I found this "old" sign on the side of the road. Like a discarded vintage gem! Ok, back to the task at hand...
Once you have it as worn-out looking as you like, then pour an antiquing glaze (also found at LOWES in the paint section) in raw umber color or use acrylic paint mixed with equal parts water and pour in a disposable cup. 
Dip a trim paint brush in the glaze/acrylic mix and wipe excess off on the rim. Then, brush all around the edges of the sign. Use a damp rag to dab where you brush so it looks more muddled and not brush-stroky.
Brush some on the letters and dab some more. Keep doing this till you are happy with how gritty you made it look. 
*don't forget about the sides of the board if you're not adding a frame.


You can build a frame around it like I did. I used hardwood (oak) 1"x2" to make the frame. 
Making a frame is a very difficult task that I will share how to do in the future. 
Most of my signs are unframed and look good that way,too. You can opt to paint the sides black.

Hanging:

You can screw in a heavy duty picture hanging wire set on the back. You must hang this on anchored screws or a picture wire hanger (found at Hobby Lobby). 

FYI: expect this take, without making frame, about 6-8 hrs to make (add another 3 hrs for the frame). There is a lot of time involved in the  hand-painting and distressing. It's worth it, though. 


Now, this is going to Texas to hang proudly and, hopefully, bring many smiles to y'all's faces! 


Monday, February 6, 2012

Making Signs

I am catching up on some orders and finished a really big 30"x40"x 1.5" custom sign today. I have improved the look of my signs with a black poplar frame around the edges.  My folk art paintings usually have a black & white stripe painted edge which I think would look good on the poplar frame, too. I will be painting some signs with the black & white stripe frame, too.


Well, I'm off to paint more signs. I just wanted to share my improved framed edge.

Happy making!
Pam


Friday, January 27, 2012

Friday, I'm in LOVE

If you ever listened to the Cure, you would know where the title came from. My husband proposed to me 16 years ago on a Friday and the first song I heard after, when I got in my car, it that song just happened to be playing. I thought it was so special.
Anyway.....I have been thinking a lot about Valentines Day and wanted to make something all about love, but nothing real good came to mind. Oh, I have had a few ideas, but not anything I just couldn't wait to make. You know what I mean?!
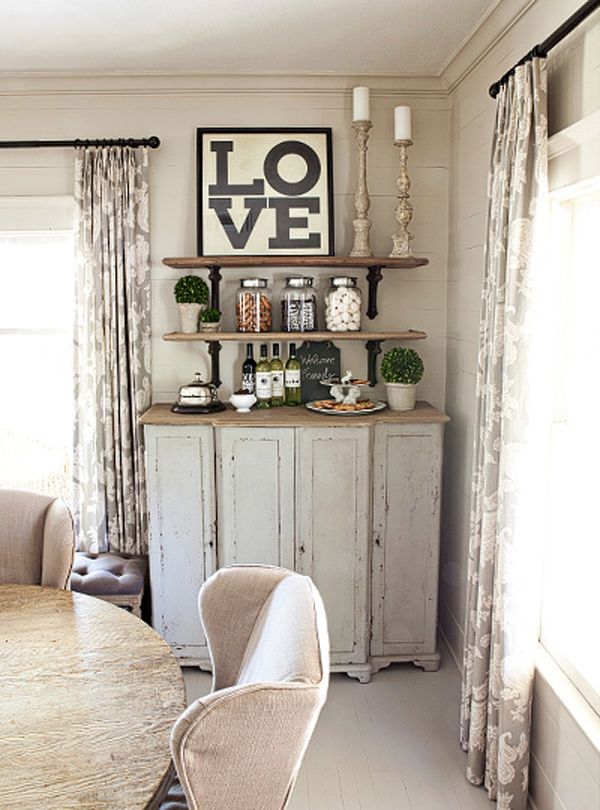
Well, I got my Lettered Cottage email today and it was full of beautiful images from Kristin Abler's home.  There is a sign in there with the word LOVE...see below...

the inspiration 
 ...and I just had to make my own version! I was totally motivated. Besides, I already had a square piece of wood painted white sitting on my table for 3 days waiting for me to paint something fun on it. 
I loved the vintage feel and simplicity of the original and I tried to capture that same style. I believe the original is a framed print, but mine is painted wood. I also painted a black border on it because the letters looked blah and lonely without it.


It was not quite ready to hang when I took the pics, but I didn't have much time before picking the kids up and I wanted to get some pics....

So, for a decorative look, I just rested it on my headboard against the wall. 

If you get a moment, skip on over to Layla's, the Lettered Cottage to check out the inspiration (there is pic of a wall of signs that is amazing & I want to make them all)!


Thursday, January 12, 2012

Not All Who Wander Are Lost Sign

All this rain and bad weather keeps us indoors and it's a good opportunity to make something for your home. With a few supplies and a little time, you can have your own wood sign like this one.


All you need is:

4"x24" wood boards (x10) 

1"x48" wood slats (x2)

short wire nails (x40)

white paint

sand paper

paint brushes

acrylics in soft black, raw umber, burnt umber

printer

paper

transfer paper


Take your 2 1x48" slats and lay on floor so they are straight and evenly spread apart. You can use a ruler and level, but I eyeball it.
Then, lay a 4x24 board across them and nail it to the slats with 2 nails on each side.
Work your way till you have all your boards nailed. You should put little gaps in between some boards to look kind of like a pallet.


Take a hammer and bang the corners and all around the edges. Also, bang all over the boards. Use different objects and lay them on the wood and hammer them to make indentions. This goes the wood a worn look, like it has been banged around.


Find a font you like and use a large font size. I used 350 and 400 for my fonts. You can get western style fonts at dafont.com. Set your font to outline only, too. this saves you ink. Print out your words and get your transfer paper. Lay the transfer paper on your wood and place your printed paper on top of it. Trace the words with a pen and the letters will transfer onto the wood.


After you have all your letters on the wood, use the outlines as guides and paint the words. 

like my pretty pink toes? lol
Sand the corners and edges and all the words to get a more distressed look. 


Now, I mix my acrylic paints to make a "Dirty Wash" for my signs. I add some raw umber, burnt umber and some water in a cup and stir. Not too watery, though. You want it dark enough to show up on the wood. I use a paint brush to paint over each wood slat with the Dirty Wash, then wipe away with a damp rag. Keep rinsing rag and wiping till you get the look you like. Leave more Dirty around the edges and corners, where dirt tends to gather. You want it to look grungy and rustic. Below, the picture shows the top half with the Dirty Wash and the bottom without.


After you achieve the grunginess you like, let dry. Then add 2 screw eyes and string to the back for hanging. Or if you would rather just lean it against the wall, like I did below, that looks cool, too.


Now, beat the cabin fever and create this pallet sign for your home! Be creative! 

Happy Making!
Pamela


You can find this post at these lovely blogs, too!: